We use cookies to make your experience better. To comply with the new e-Privacy directive, we need to ask for your consent to set the cookies. Learn more.


0
My Cart


There are a number of tried and tested methods of effectively capturing astrophotography. But before you pack your camera bag and head out into the desert, we recommend taking some time to prepare. Knowing the basics of how to capture star trails and the galactic core of the Milky Way will be of great benefit. In this article, we are going to cover some of the basics of astrophotography, especially how to use long exposure effectively.

Long exposure in astrophotography allows you to capture stunning shots. We'll also discuss adding foreground elements and light painting, both of which were done in this image.
Astrophotography is one of those pursuits that was born from astronomy and the science of viewing the universe. But it probably goes back even further to something far more primitive. We all love staring at a bright starry night sky in wonder at the universe. Astrophotography is all about faithfully documenting and reproducing what we can and cannot see in the night sky.
Astrophotography doesn't need an observatory on top of a mountain to be successful. Nor do you even need a telescope, although you will certainly need a tripod. Astrophotography is more technical than many other genres, so you need the knowledge and ability to control your camera settings correctly. In this way you can expose your sensor to as much light and detail as possible.
With astrophotography, you need to begin with an area that is free of light pollution. By that, we mean free from usual suburban lighting, car lights, street lights and any other light. Typically, you need to find a spot that is in a regional area with no nearby lights.
Finding such a location can be made more accessible by joining some astrophotography forums in your area. Talk with other photographers to get tips and useful sites. This can be especially beneficial if you want an area that also has some points of interest in its foreground, which we will cover in more detail a little later.
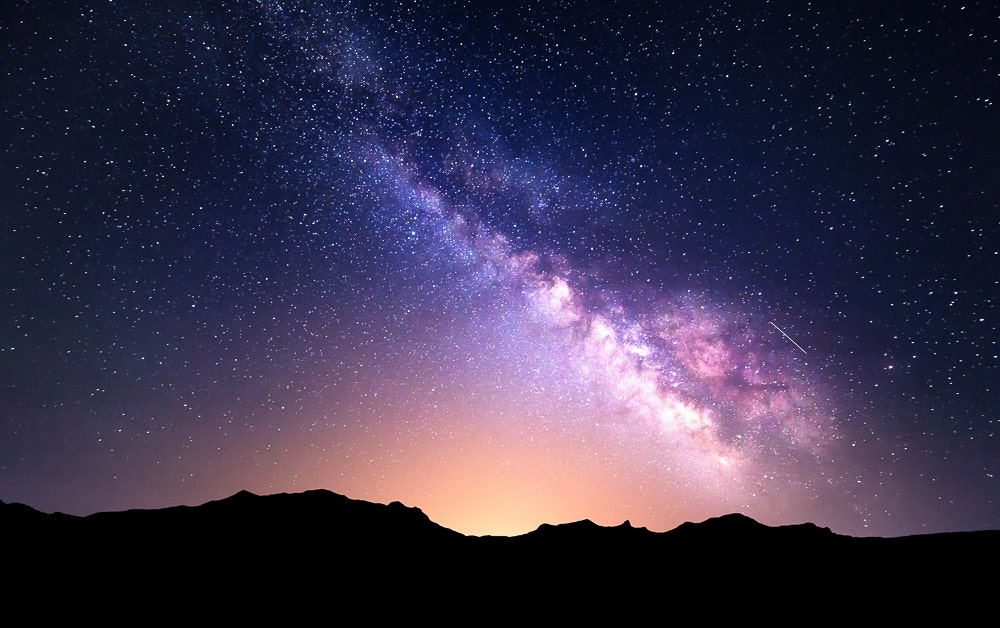
The glow coming from past these mountains is light pollution from an urban area. You'll need to select locations far from urban areas in order to avoid this.
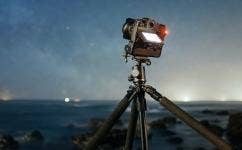
Without a doubt, you are going to need a sturdy tripod to capture clear and precise astrophotography images. A tripod is going to be your best friend as you are going to rely on long exposure times in order to capture your images. A tripod will hold the camera still, so the camera sensor will detect no shake. Attempting to shoot astrophotography handheld is functionally not possible. As a quick recommendation, an excellent tripod for long exposure in astrophotography is the Manfrotto 290. It is a reliable and robust tripod that will prevent any form of camera shake. Further to this, it has a rigid aluminium frame with a fully adjustable ball head.
Think about what happens to your eyes when you walk into a very dark room. Your iris will start to open up wide in an attempt to capture as much light and detail as possible. Within minutes your eye will be able to pick out details as it becomes accustomed to the low light.
Astrophotography works in a very similar way. As it is a very dark environment, you will need to take extra steps in order for your camera to capture enough light to expose correctly. The best way to do this in an astrophotography setting is to shoot with a very slow shutter speed, which allows your camera to collect light for a longer period of time. If it were only open for a fraction of a second, which is what most shutter speeds are in more "standard" genres of photography, there would be no way to capture enough light. The benefit of this is that with long exposures the camera sensor can gain far greater detail than even the human eye can. This is why many astrophotography images seem to capture more stars than you've ever seen with your naked eye on a clear night. It is this level of detail that is critical to capturing vibrant and amazing images of the Milky Way and its galactic core.
 |
 |
The length of exposure required means you will have to use a tripod to shoot astrophotography
When shooting astrophotography, you need to use a longer exposure, but how long is long enough? If you want to shoot a clear star field and gain detailed images of the Milky Way, then you want every star to appear as a dot. If you have the shutter speed set for too long, then those dots become ovals and then blurs. This is because the stars are moving their position in the sky as the earth rotates. It's too slow to be seen with the human eye, but a too long shutter speed on a camera can capture this, resulting in blurry stars.
In order to avoid this, we recommend the 500 rule as it gives you an approximate starting point for setting your shutter speed.
If you are shooting with a full-frame camera, using the standard of 500/focal length determines how long you can keep your shutter open before the rotation of the earth starts to cause motion blur. So with a 16mm lens, you can have a shutter speed of up to around 30 seconds. (500/16 = 31.25 seconds).
If you are shooting with a crop sensor camera, then the rule changes slightly to be 300/focal length. If you have a 35mm lens, then the shutter speed can be up to around 14 seconds. (300/35 = 8.57 seconds). Note, the 500 rule is an approximate guide and not an exact science.
Too long of an exposure can result in the stars becoming blurry
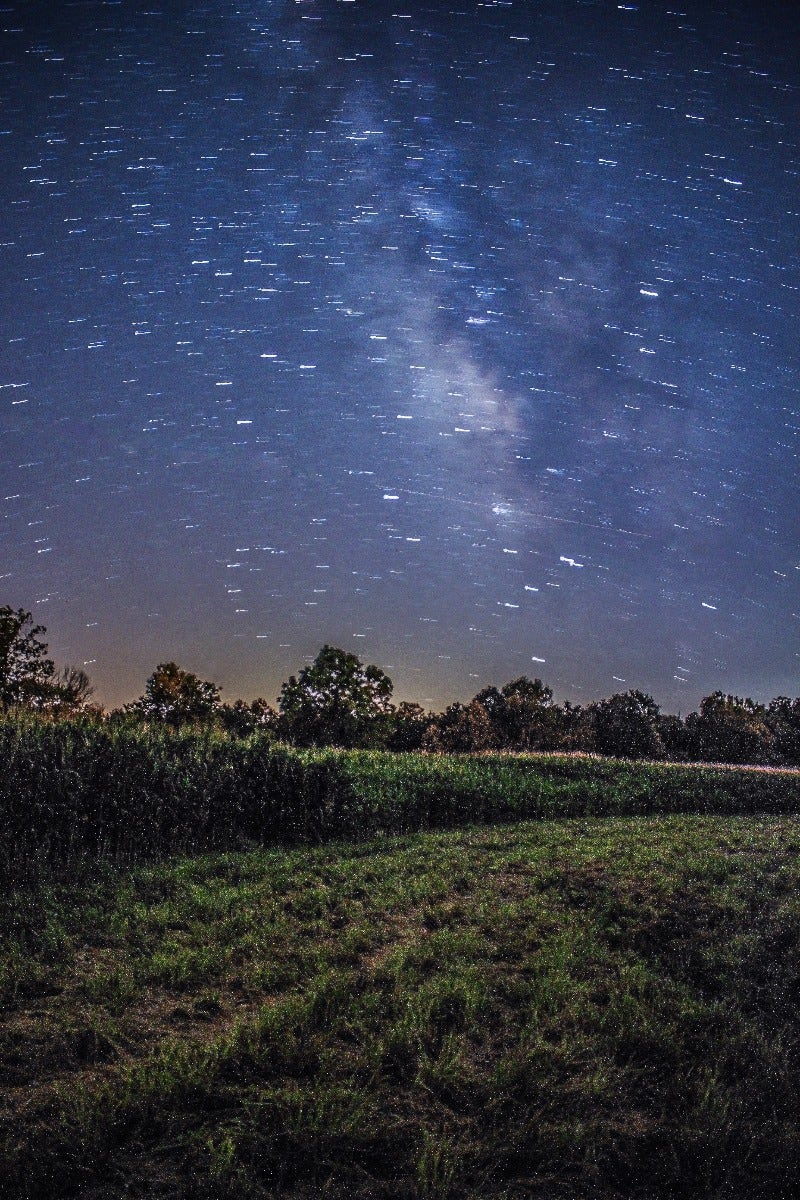
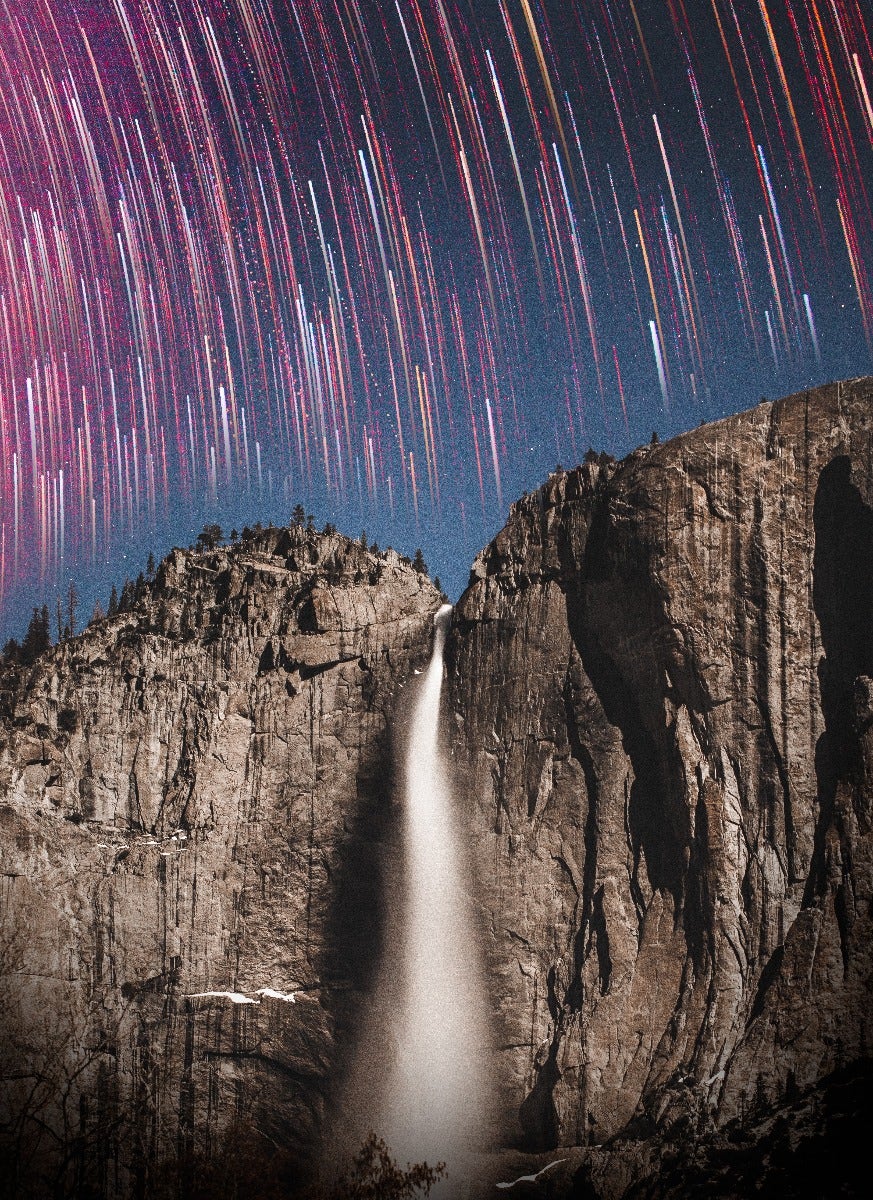
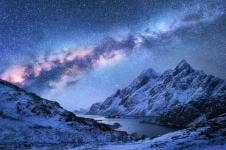
Using long exposure in astrophotography can achieve many different looks. A crisp shot of the galactic core is just one style. Another style of astrophotography is shooting star trails. Star trails occur when each star has moved position due to the rotation of the earth as it moves it leaves a trail behind it. These images intentionally portray the movement of the stars across the sky.
How long you want your star trails is entirely up to you. In some cases having an image with star trails of around 2cm long might be very appealing. In some cases, you can have star trails that complete a full rotation and in the image form long perfect circular trails. It will depend on your preference and possibly on the context of the other aspects of your image.
Capturing star trails is done in one of two ways - either taking a series of moderate length exposures and stacking them together when editing, or taking one extremely long exposure. We'll discuss each of these more below. But regardless of which technique you use, you are going to have to be aware of your battery condition. You should consider an external power source or a battery grip with additional batteries on board. Long exposures can chew through batteries very quickly, especially with mirrorless cameras. This is especially true with star trails as your camera may well be taking photos for 2 hours or more!
The other consideration is to know in advance what the weather conditions are going to be. This is important not just for the first hour but for the whole time that you are on location. There is no point setting up a star trail capture if the sky will cloud over halfway through! As you can see, star trails are a more advanced form of long exposure in astrophotography, but with practice they can lead to some exceptional results.
 |
 |
The left image uses short star trails, while the right has longer trails (and therefore was taken over a longer period of time)
Capturing star trails with a series of moderate exposure images is by far the simplest method of obtaining star trails. The reason for this is that you can take a single image with an exposure time of around 60 - 90 seconds. You then repeat that step dozens of times - it's almost like capturing a long, slow time-lapse video.
Once you have captured a significant amount of images, you will have been able to gain enough to complete a full rotation of the starfield. Each image will show each star with a short star trail behind it. Later, in post-production, you use your editing software to stack all of those images together in a way that completes the full star trail.
In the northern hemisphere, you can use Polaris or the North Star as you centre point for star trails. The rest of the stars will move in a circular motion around Polaris, forming perfect star trails. In the Southern Hemisphere it is best to aim for either Souther Cross or Carina.
The other method of capturing star trails is to use a single, extremely long exposure. Depending on how long you want your star trail to appear, your shutter speed will likely be at least 90 minutes. However, depending on the result you want to achieve, your shutter speed could exceed 3 to 4 hours.
Such long exposure is the least preferable solution as it can result in some issues. Operating for that long may cause your camera may become incredibly hot, which can cause degradation of image quality. You may run out of battery long before you even get halfway. There is also just generally more room for error here. A minor mistake on the camera settings, tripod positioning, or other issues may result in you waiting 4 hours for a shot that doesn't turn out.
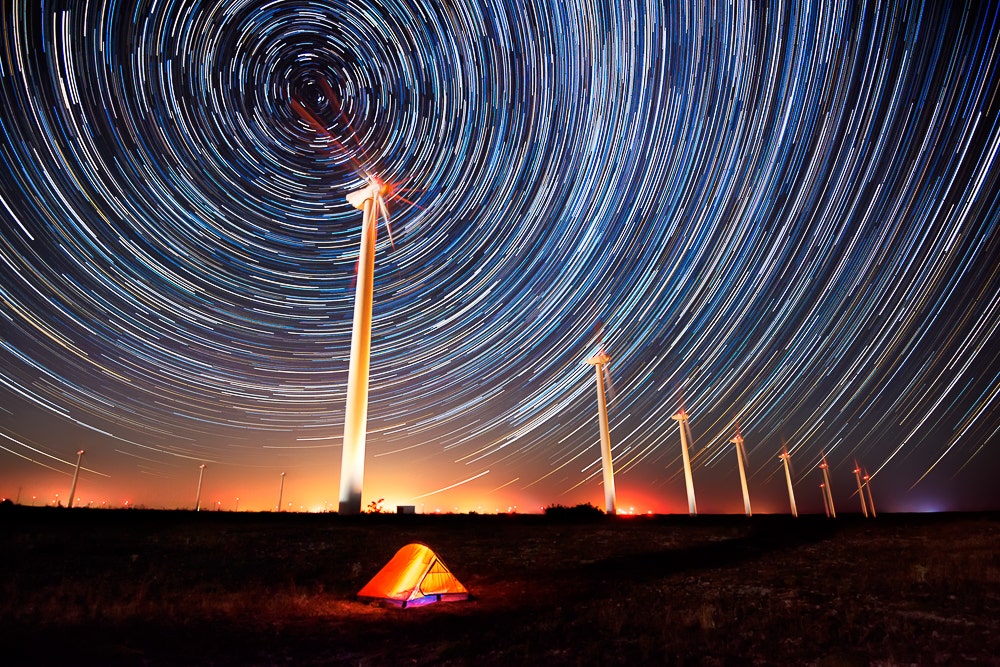
Star trails can result in very dramatic images
Most cameras do not have a shutter speed that you can manually adjust beyond 30 seconds. If you want to have a longer exposure time, then you are going to have to resort to a shutter speed setting known as Bulb. Most modern DSLR and mirrorless camera have Bulb, which is often located on the shutter speed control dial.
Bulb mode allows you to obtain an exposure time as long as you want. Once you press down the shutter button, the shutter turns on, and it will not close down until you remove your finger from the shutter button. The biggest issue with this is that during a long exposure, even the slightest movement of the camera will result in image shake.
To combat this, you will need to invest in a simple remote control for your shutter release. In some brands, you may be able to utilise a connection to a smartphone app to control the shutter. In other cases, a physical device will connect to your camera via a cord. With this in place, you can start and stop your exposure time without having to touch the button.
Some camera manufacturers have chosen to specifically target astrophotography with their cameras by including features and functions to meet this need. Olympus is one of the main such manufacturers to do so, and many of their cameras feature both their Live Time and Live Composite modes.
In Live Composite, the camera takes a series of images that all have the same exposure settings. It then blends these images together in-camera. However, the first image is recorded as a baseline and for the future images the camera will only record increases in exposure compared to that first image. For example, if you have a shot of the Milky Way with a foreground terrestrial feature, you can expose for the Milky Way. You can then use your flashlight to light paint (discussed below) the foreground feature for as long as you want (with the ability to check your work on the camera's LCD as you go) and not overexpose the stars.
Live time is used to give the shooter more flexibility in deciding their exact exposure time. Similar to Live Composite, in Live Time a series of exposures are taken and composited together in camera in real time. Unlike Live Composite, in Live Time the exposures are added on top of one another so the whole image increases in brightness with each successive exposure. You can watch the image build in brightness on the LCD screen and manually stop it whenever you are content with the total exposure level. This avoids having to know exactly how long of a shutter speed you need to shoot to capture the correct exposure, which can be useful when dealing with exposures that may be 45 - 90 seconds. Instead, you can watch the image build successively over time and choose to stop when the overall exposure suits you.
Specialist modes like Live Time and Live Composite can make it easier to build your images
Most Olympus OM-D model cameras have both of these features. If you are new to astrophotography, the Olympus E-M10 IV is a compact and relatively inexpensive camera that sports these excellent astro shooting modes, and can be used for many other styles of photography as well.
Now that we have walked you through how to use long exposure in astrophotography let's take a look at some of the creative options available. Granted, having a wide clear shot of the galactic core in full bloom can be stunning. But with a few tips you can take that image to the next level.
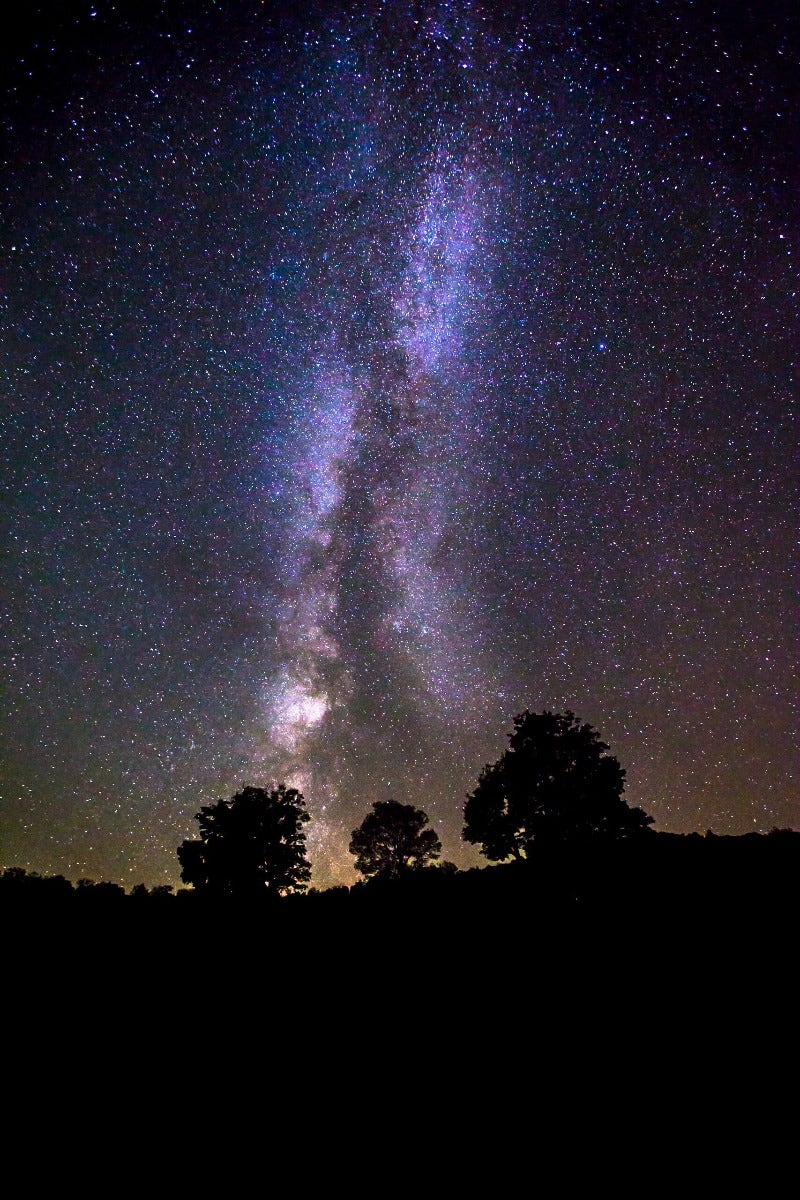
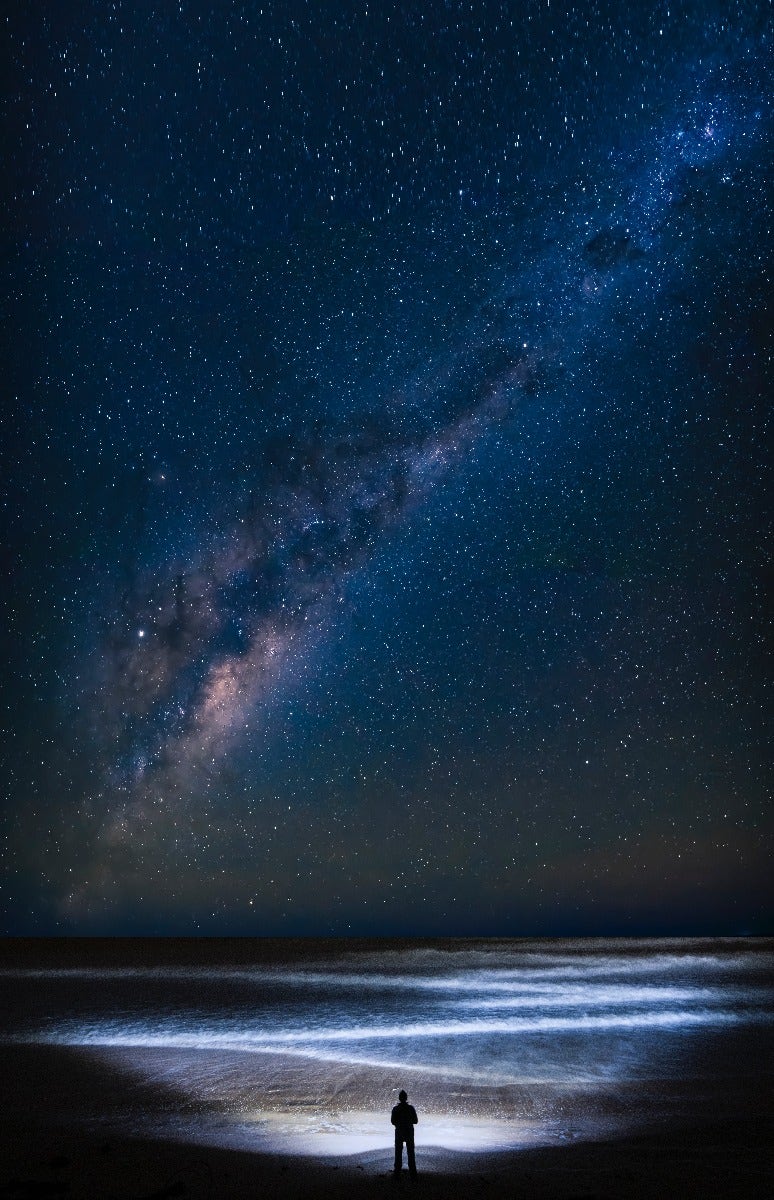
While it may be tempting to just take a shot that is all sky, more often it is better to anchor your astro image with some foreground terrestrial point of interest. This anchors the image and provides context for the vastness and scope of the galaxy behind. Let's take a look at a common point of interest to be on the lookout for when framing your composition or finding your perfect location.
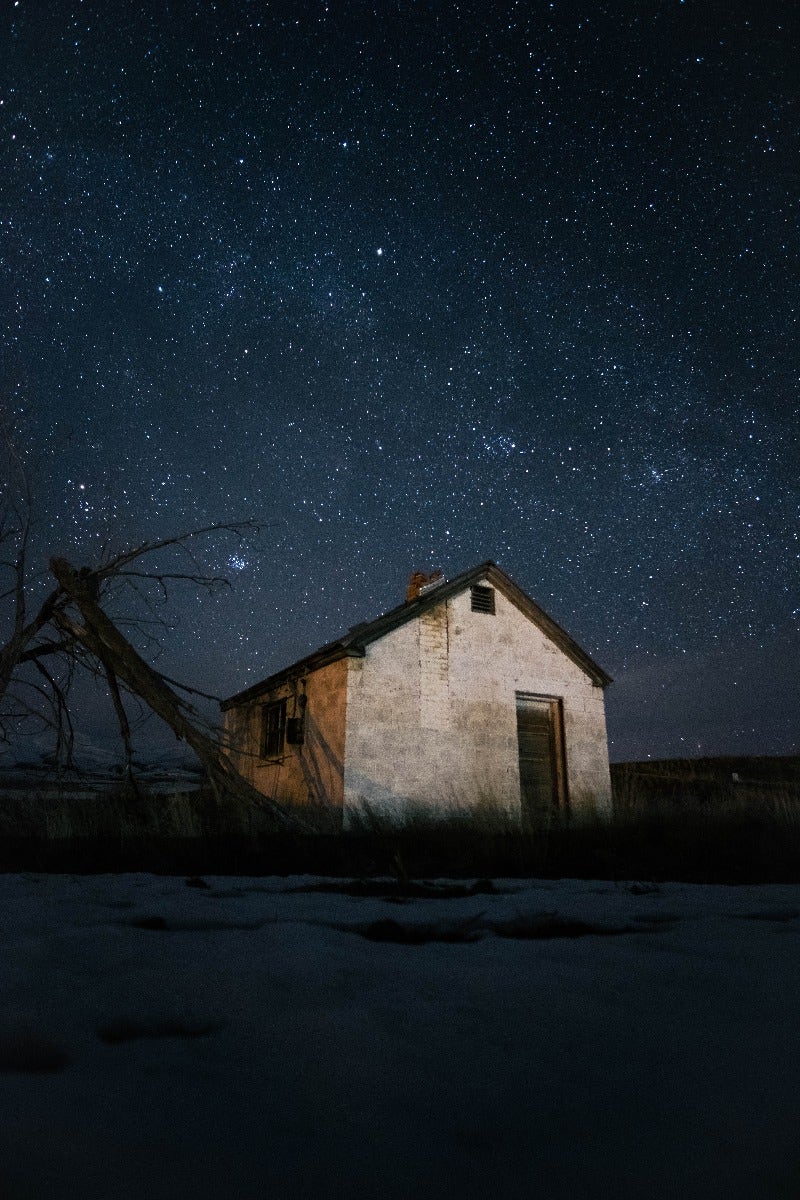
If you are in a natural setting, then the kind of objects that make a great point of interest include large dead trees, rotten tree stumps or even boulders. But it also essential to be on the lookout for other exciting elements such as derelict buildings and farm sheds, old silos, broken down and rusted out farm equipment or even old cars. These all add drama and an exciting story element to your long exposure.
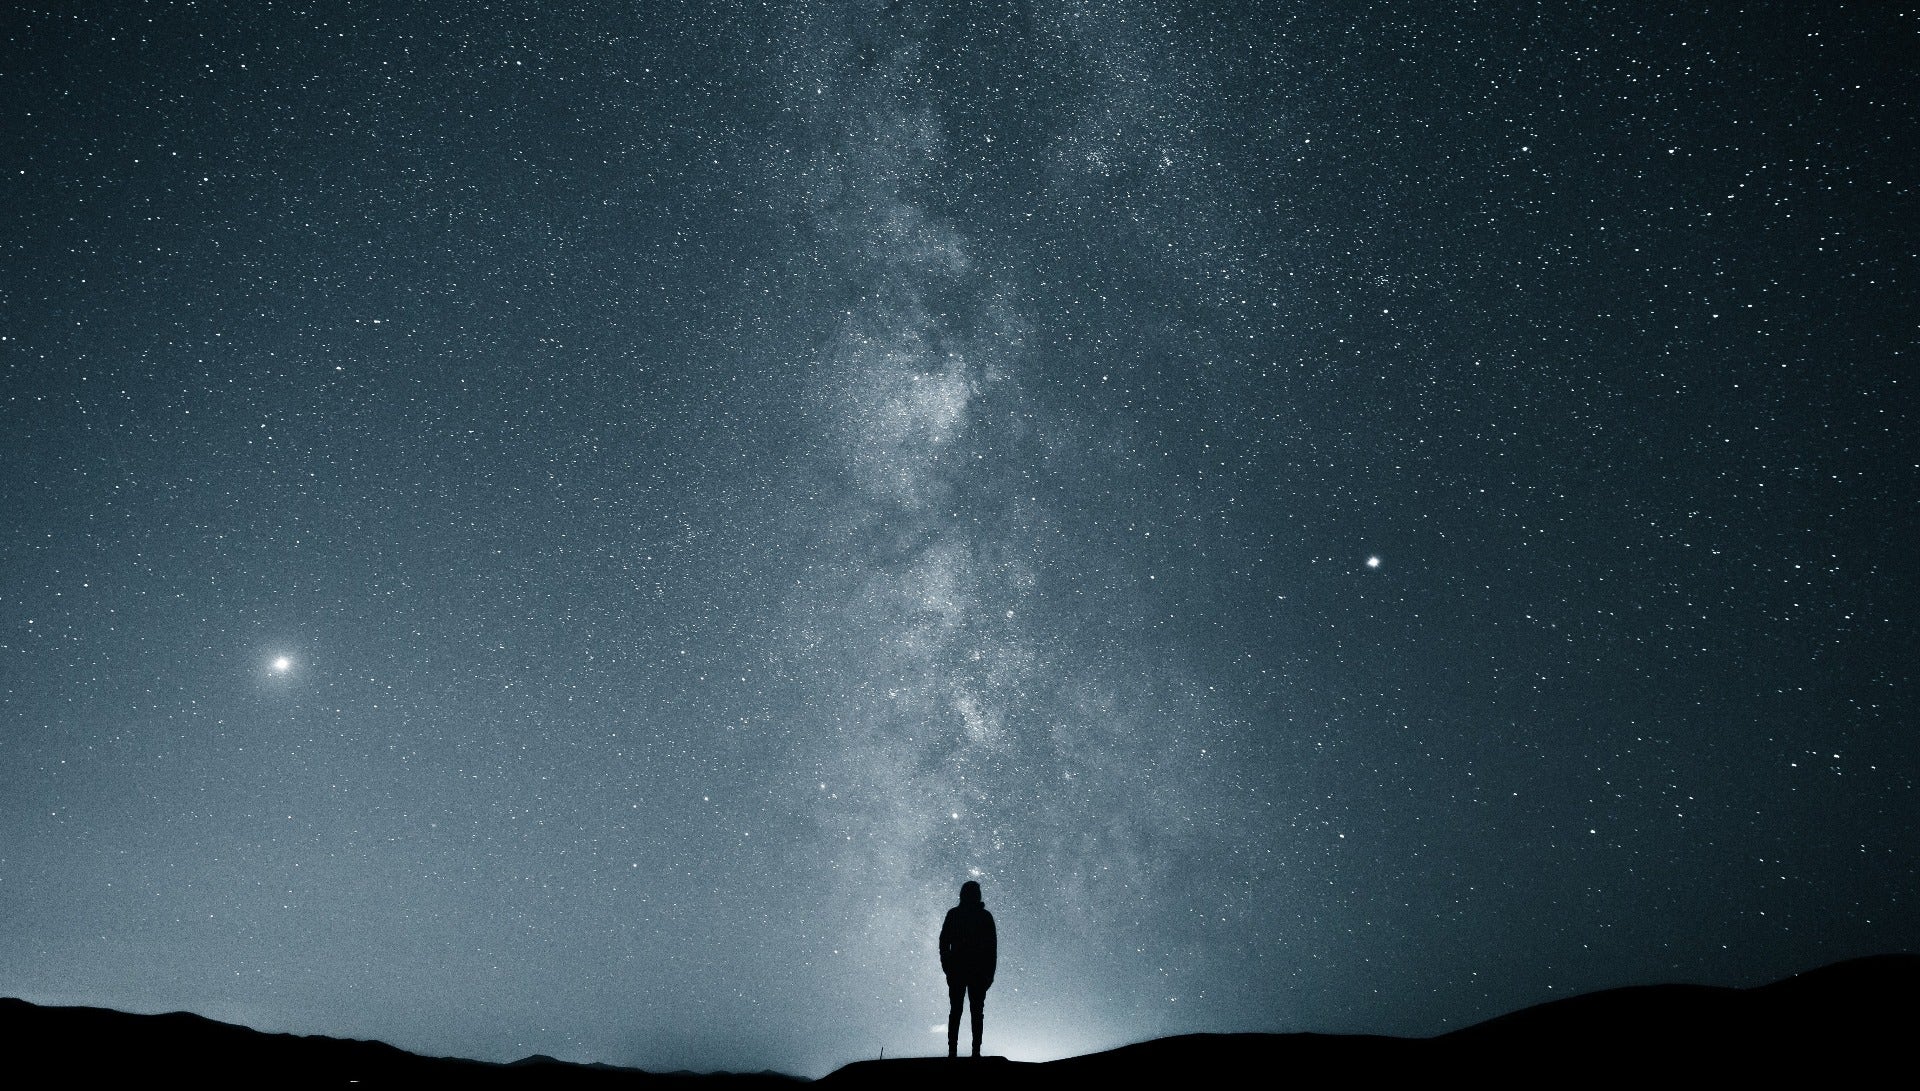
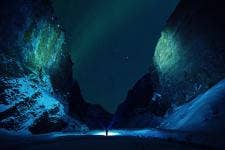
One interesting option would be to become the point of interest yourself! Set your camera on a timer and then walk out several meters in front of your camera and stand still. Hold up a lantern or point your torch beam in a single direction up to the sky. The result will be dramatic and heroic, so please be sure to give this a shot.
 |
 |
Left: foreground subjects can bring context to your images, even as silhouettes. Right: The foreground subject could include yourself!
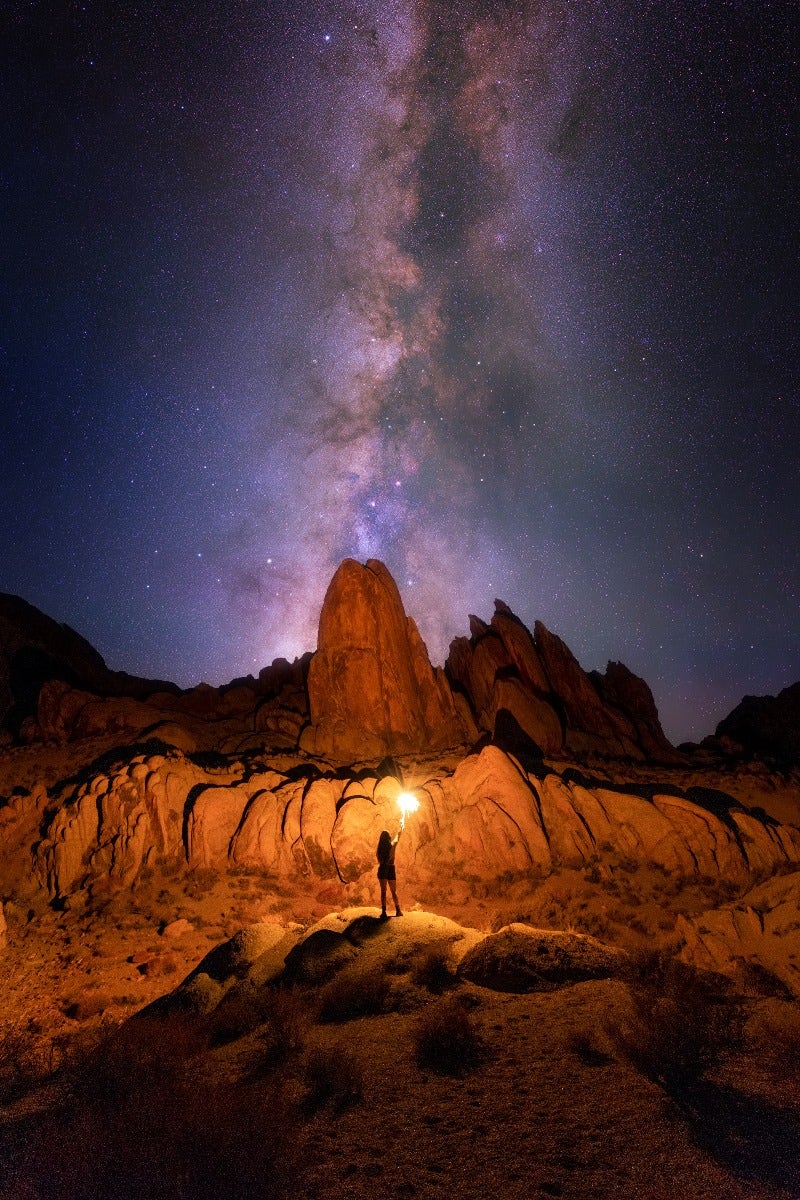
In order to get the most out of your static points of interest, you may want to utilise light painting. Since it is so dark, unless there is a light source in your point of interest, it's likely only going to appear as a silhouette. This can be enough, but depending on the specifics of the point of interest you may want to use light painting to bring out more detail.
To do this, you direct light at your point of interest while your long exposure shot is happening. To 'paint' an object in light, you will need a light source that you can direct and control. Typically this takes the form of a strong high-beam torch. While your camera is taking the image, point the light at different areas of the foreground subject. In the final image, your camera will have picked up that light and the object will be lit up. There is definitely an element of practice and trial-and-error here. Too much light and the object will be overexposed or overpower the stars. To complicate this, how much is "too much" will depend on how powerful your light source is and how long your exposure is. But take the time to practice this and you will get the hang of it, creating brilliant long exposure shot where the stars will loom large in the background while your point of interest sits highlighted in the foreground. You can also experiment with other, more usual light sources including lanterns or even glow sticks swung in wild or intentional patterns.
 |
 |
You can use light sources to highlight elements of your foreground points of interest
On a good clear night, there are approximately 5,000 stars viewable to the naked eye. Our sun and its little solar system are just one of 100 billion stars estimated to be part of the Milky Way. And that is just our galaxy.
So why not invest some time looking upwards with your camera and capture fantastic astrophotography images of the yet unexplored galaxy? Long exposure in astrophotography produces incredible photos that remind us of our place in the universe.
If you're looking for some help figuring out the right gear in order to take amazing astrophotography images, don't hesitate to contact us. Our friendly digiDirect staff are accomplished photographers and can help you get the right gear for your needs, always at a great price!


Comments
No Comments yet. Be the first to comment.